Configuration of your VESC® or VESC® based ESC using the VESC®-Tool Software.
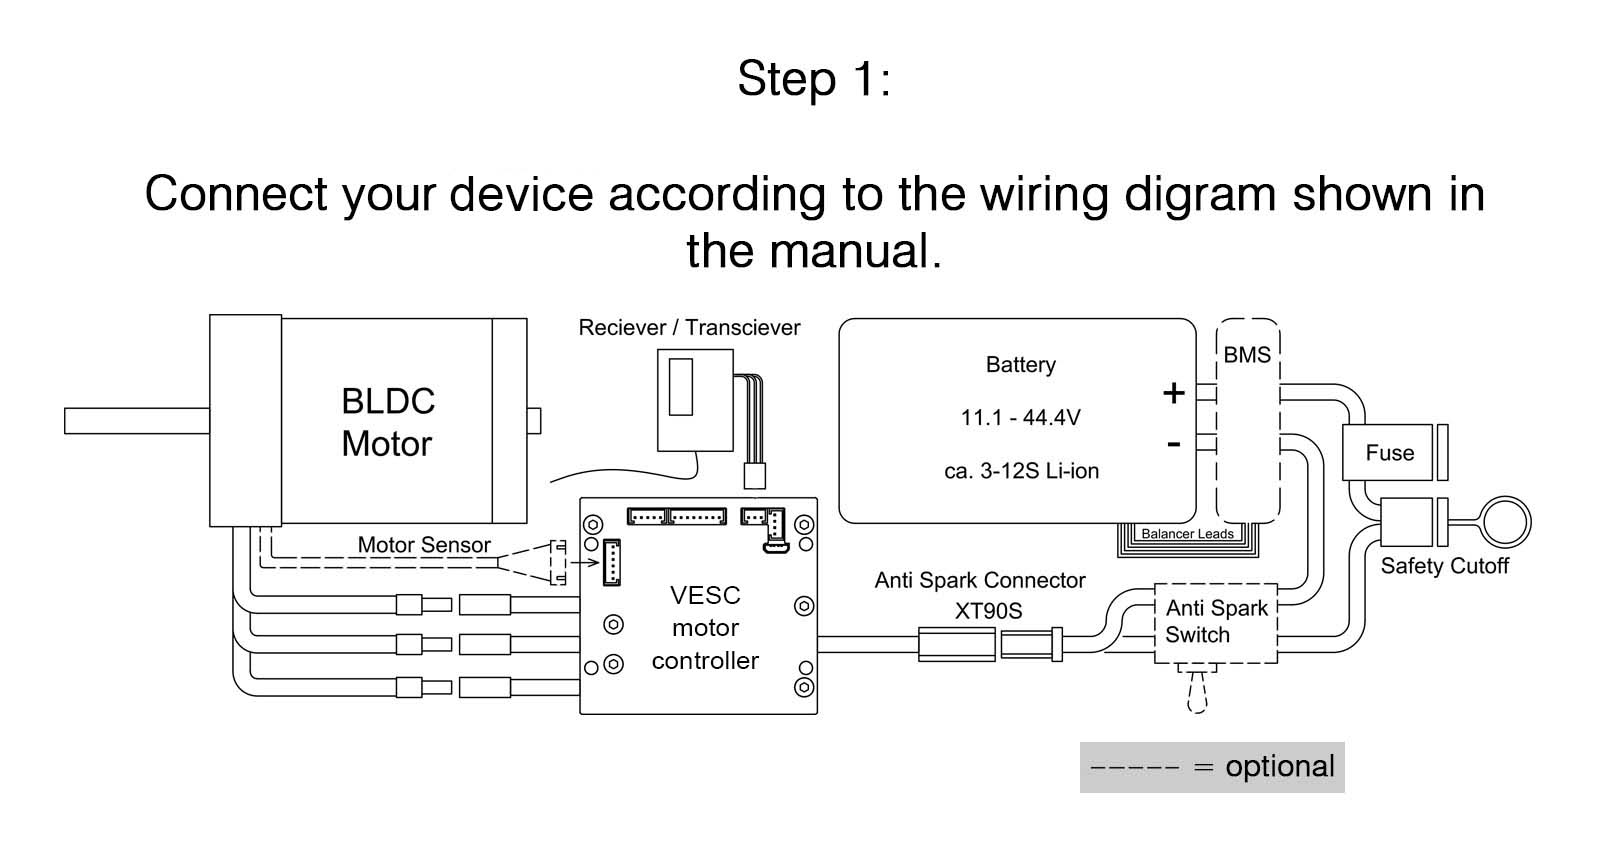
In this tutorial we will configure a genuine VESC® motor controller in combination with a BLDC motor.
We will run the motor in FOC mode and we will make use of Hall sensors.
Make sure to use the latest VESC-Tool version!
Download from http://www.vesc-project.com/vesc_tool
![]()
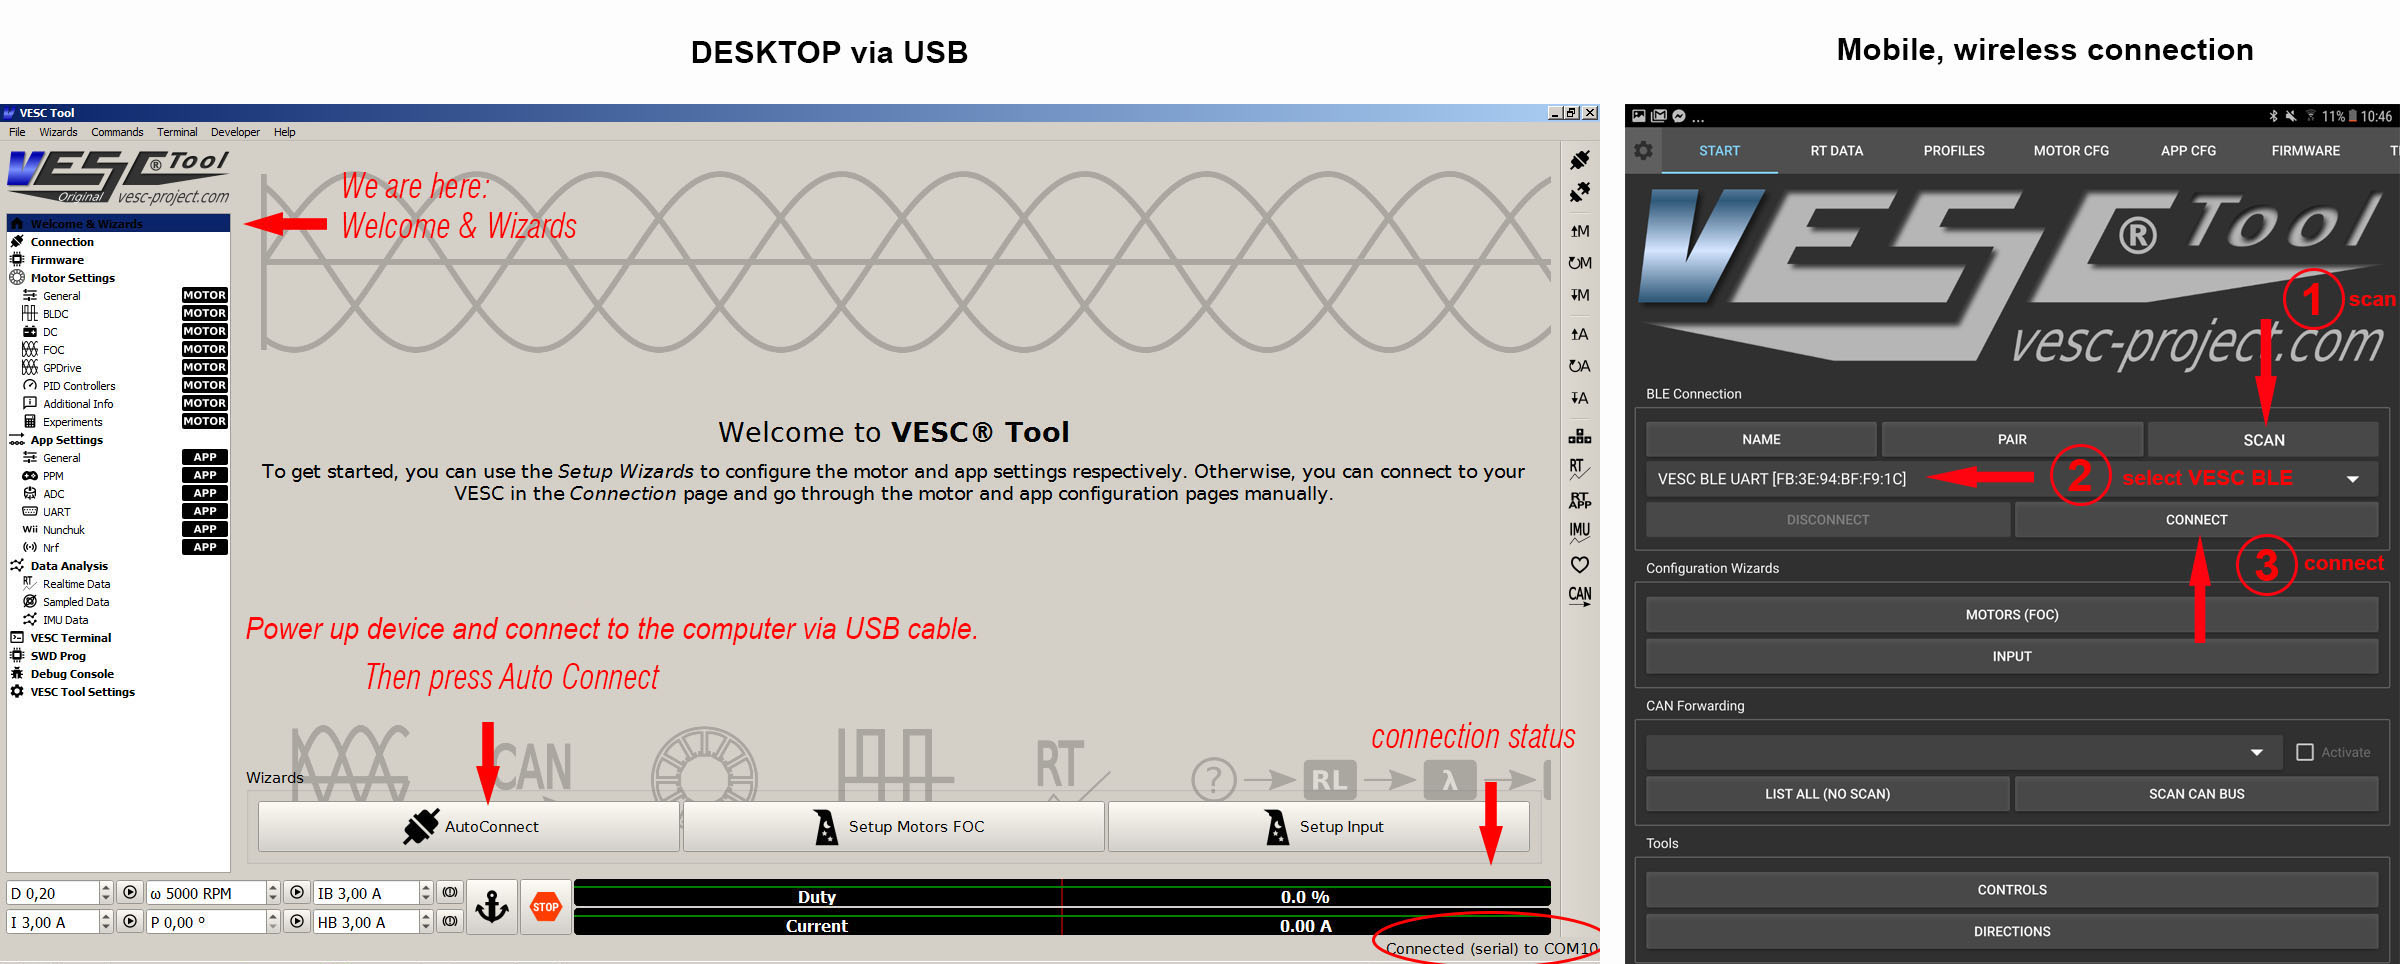
Setups using arrays of VESC devices are configured in one hit, as long as they are interconnected via CAN cable
Connect your VESC® motor controller to your computer using a mini/micro USB cable.
Mini USB is used for HW 4.xx only. Some cheap micro USB cables are designed for charging your
phone and will not work properly! Try another cable if you experience any issues.
Run the VESC®-Tool software.

Lets choose the correct motor size and type:
Example: If you want to use the VESC ESC as a controller for your electric skateboard or scooter, the 750g Medium Outrunner is 99% chance your motor to choose.
No matter if your motor is 6064 or 80100, the size category is still the Medium Outrunner. For other motor types and sizes, please choose accordingly.

Now we will tell the VESC motor controller about your battery. This is important to get right!
If you discharge your battery below a certain voltage, it will get damaged permanently. LiPo packs or Lithium Ion batteries usually operate between 4.2V and 3.1V per cell. Do not allow your system to discharge them beyond 3.1V per cell! For this reason the VESC controller will measure your battery voltage and will start to softly cutoff the power at 3.4V per cell (Battery Voltage Cutoff Start) and it will perform a hard cutoff at 3.1V per cell (Battery Voltage Cutoff End).
You can also set custom values if your cells have different ratings. This can be done in Motor Settings >>General after finishing this Wizard or by activating the advanced settings in the Wizard.
IF YOUR BATTERY CAN'T HANDLE THE CURRENT DRAW OR REGEN CURRENTS YOUR MOTOR IS RATED FOR, YOU CAN ADJUST VALUES ACCORDINGLY IN THE ADVANCED OR OVERRIDE TAB!

ADVANCED SETTINGS guide for less capable batteries:
Check your battery ratings and adjust accordingly. Please note: This is the value per controller / motor! If you run two VESC motor controllers on one battery, you need to cut your safe battery limits in half. -25A becomes -12.5A, 100A becomes 50A etc.
Current MIN is the value that is used during braking/regen (storage of energy into the battery). The motor operates as a generator and the VESC controller pushes a maximum of X Amps towards the battery during barking.
If your battery can only handle a burst charge of X Amps, you can limit the Amp flow here to protect your battery. Most batteries are rated for a charge current of X Amps, which refers to an extended charge period using a battery charger. Burst charge currents (for 10-30 seconds) are hard to find in data sheets but are usually higher than the constant charge currents. Low Battery MIn values result in weak brakes at speed! A test for appropriate brake strength needs to be done at full speed. Be careful when using a discharge BMS (Battery Management System)! The battery current settings need to match the capabilities of the BMS. Discharge BMS systems may protect themselves and decouple the VESC controller from the battery. Total loss of power and brakes and/or destruction of the hardware may be the result!
Current MAX is the value your battery will get discharged with at full power. If your battery or BMS can't deliver more than X Amps safely, you can define a max value for current draw here.
Example for a single drive: We have a 12S 10000mAh LiPo battery that can deliver 100A constant current (10C rated battery), so a max of 100A is a safe setting. It is advisable to stay well below max ratings for certain batteries. Some vendors tend to overrate their batteries for marketing purpose! We choose 60A for our setup. In many cases Motor Max is below Battery Max and will limit the Amp flow to the Motor MAX value regardless.

Gear ratio and wheel diameter:
If you want accurate real time data, the VESC motor controller needs to know the gearing and wheel diameter. Once set, you will get very accurate feedback on the VESC-Tool App.
Speed, estimated range, Wh usage per Km and many more. It's worth fill in accurate parameters. Measure up your wheel accurately!
Here are some measurements for small pneumatic tires.
6.5" pneumatic = 165mm diameter
7"pneumatic = 175mm diamater
8" pneumatic = 198mm diameter,
9" pneumatic = 222mm diamter

Wheels off the ground, propellors disassembled, fingers out of the way?
It's time to spin up your motors!

After detection we can now check the results to be reasonable
Resistance OK? Motor current reasonable? Sensors detected? Similar values for both motors (if the same)?
Click OK if everything looks good.

Everything spinning in the right direction?
Click on Fwd to spin the motor in forward direction. If it spins backwards, tick the Inverted check box

Congratulations, you have finished the Motor Setup Wizard!
Warning! For E-Skate and some other applications you now need to set DUTY CYCLE CURRENT LIMITS.
Warning! Failing to set the duty cycle current limit value to 85% on all VESC motor controllers in your system will affect your ability to keep the balance when reaching top speed!
Please watch this video tutorial to manually set the necessary values. DUTY CYCLE CURRENT LIMITS
Please continue with the Input Setup Wizard once you finished the motor setup.
Changing parameters after finishing the Wizard:
In the left Menu bar you can choose Motor Settings >> General to change the most basic values.
Changes only affect the connected VESC motor controller! Make sure you change values on all VESC controllers in an Array!
Connect to each VESC motor controller via USB or CAN Forward and change settings!
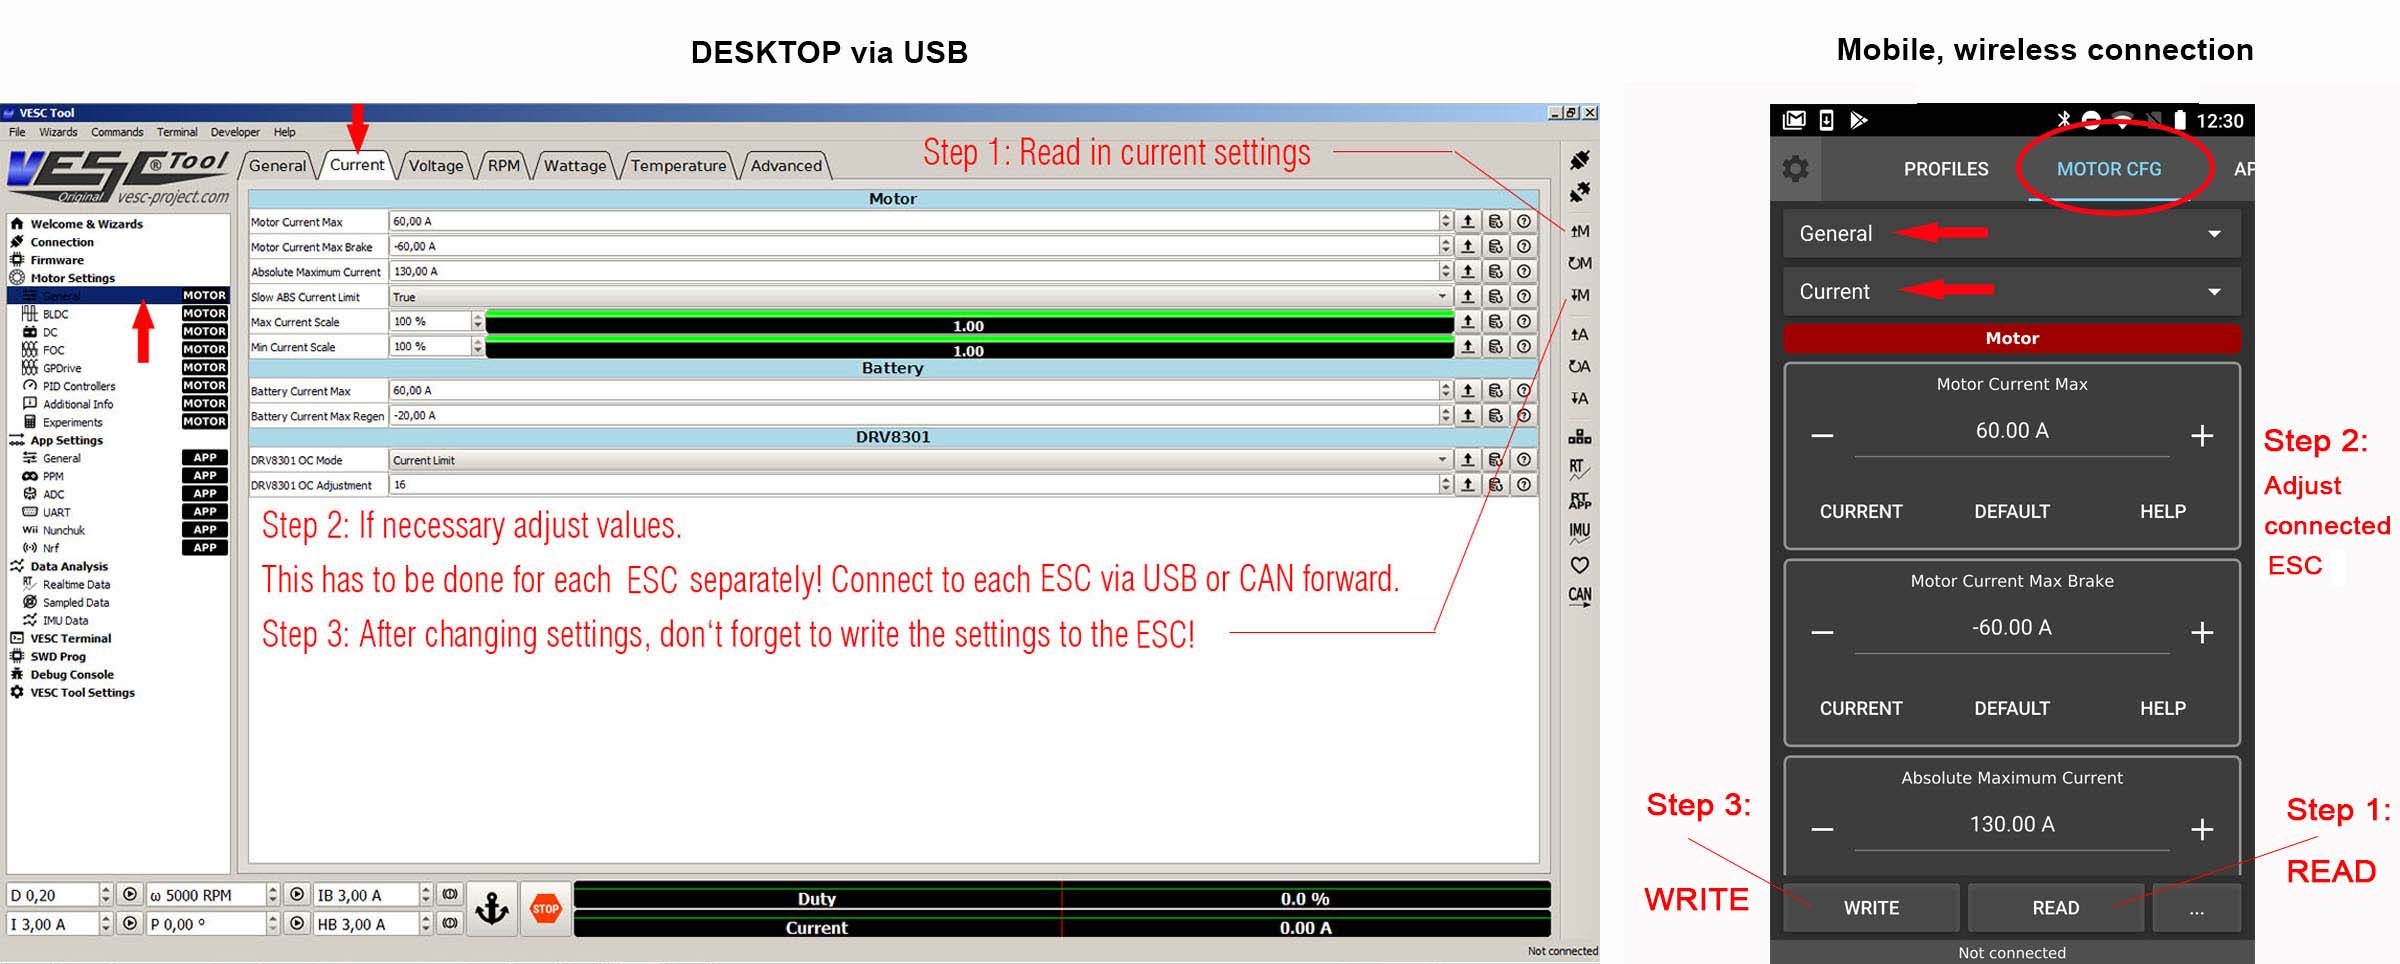
The following explanations will help you to configure your current limits correctly:
Motor Current Max: The maximum current your motor can handle (Ampere). Please refer to the motor specifications of your motor. You may use lower values to de-power your setup.
Example: Our motor can handle 40A, but we will only set it to 30A to get started. You can boost your settings once you feel comfortable. A safe approach towards higher values is highly recommended (e.g. start with 15-20A only).
Hint: This value can be greater than the Battery Current Max value, resulting in a higher motor power output at part throttle. At max throttle the Battery Current Max is the limiting value if set lower than Motor Current Max.
Motor Current Max Brake: The maximum current output you allow your motor to produce when operated as a generator. Electric vehicles may use the motor as a brake, generating energy when slowing down the vehicle. The energy produced will be stored in the battery. In this tutorial we will set the value to -30A to get started. The value should not be higher than the max. continuous current specification of the motor.
Hint: Higher values will result in stronger brakes if the Battery Current Max Regen settings allows the storage of the current generated.
Battery Current Max: The maximum continuous current your battery is rated for. Please refer to your battery specifications for safe settings. LiPo-pack batteries are usually C-rated. A 5800mAh, 25C rated battery can handle 5.8A x 25=145A max. Manufacturers often overrate the batteries and cutting the value in half is recommend. We will use 72A max for safety reasons.
Hint: Since our Motor Current Max is set to 30A, we could use 30A for the battery as well.
Technically there is no reason to use a higher value than the Motor Current Max.
Battery Current Max Regen: The maximum current you allow the ESC to push towards your battery or battery management system (if incorporated in your system) when braking. Battery Current Max Regen is important for brake strength at speed! Low settings result in weak brakes at speed! This value should not exceed the maximum burst charge current rating of your battery or capability of your battery management system. So lets set that to -30A for a skateboard with a big battery (e.g.12S4P LiIon)
Comments
Split the capacity Ah Value ?
Hello,
for the Point enter capacity value:
When I use 2 ESC´s with Can Bus should I then share the Ah value ?
Because I see it on some YouTube Videos , but I think it was with an older VESC Tool Version.
Thanks and best regards
If you run multiple motors
If you run multiple motors/ESCs on one battery, you need to devide by numbers of motors. VESC-Tool can't know if you use a single battery for all ESCs, or separate batteries for each ESC.
The capacity value for the
The capacity value for the battery should actually not be divided. Current and regen should.
Can it be used to run PMSM motors?
Can the VESC 6 be used to run PMSM motors in the FOC mode.
Battery parameter
Im pretty new to this and Im having a hard time programming my dual 6.6 Fesc. I have the basics motor, wheel and pulley size correct. As far as the battery I dont know what info to put in for cells and capacity. Im running a 10s4p battery, 12000Ah, 30Q, 36V. I have the flipsky V2 pro remote and it keeps showing board is going in reverse instead of forward and the mph is not accurate. I have both motors checked as inverted and they both spin in the direction they are set for when using the remote. The remote works but it doesnt do anything on the vesc screen when you go to calibrate it. Any help would be greatly appreciated.
Reverse your VX2 remote
To fix this issue, set your VX2 remote to reverse.
Trampa Motor 6376 - Difference in Motor Current
Hi, im also new here. while im setting up my 6376 trampa motors, the test result is giving me approximately 60 Amp for Motor Current. Noting that these motor listed peak power is 3800 Watts. can i increase the current more than 60 AMP to 75 AMP in VESC Tool without damaging the motors?
They will handle 75A but
They will handle 75A but using more Amps will make them run hotter in average.
probleme de conections vesc et moteurs
Hello, I cannot update the vesc tool software. yet i just bought it today
You can just download it
You can just download it again. Under "Purchased Files" you will always find the latest VESC-Tool for download. This folder always contains the latest version.
Only one wheel spins
Hello,
I done this successfully but i have dual motors and when i finish the setup only one of my motors are spinning, but in the FOC motor detection both of the motors were running. Any ideas o what the problem is?
To answer this question, you
To answer this question, you need to give an idea how the setup look like.
Battery overcharging
Is there a safety measure that reduces the charge current when the maximum voltage of the battery is reached?
I did not find a setting where I can set the maximum battery voltage.
You don't need to do anything
You don't need to do anything to limit the regeneration charge current.
Motor settings amperage
Just struggling with this a little, I'm specifically using the stormcore 100d and I have a battery capable of outputting 300peak amps, my motors are rated at 90 amps and I have two of these. When I set motor current max do U set that at 90 if I want to have it at the limit per se or would it be 180amps
Thanks heaps in advance
Detection failed. Reason: Sensor detection failed
I'm getting this error when I run detection: Detection failed. Reason: Sensor detection failed.
The controller is lighting up and everything looks connected. The controller and motors are brand new. Any idea what's causing this?
Sensor detection fail
I have same problem. Is there a way with the VESCTOOL to just check sensors? I checked the Halls and rotated motors by hand to check and the output did go from gnd to 5 as expected for each hall...so what's not detected??
Yes, i have similar issue,
Yes, i have similar issue, will be interested in a fix.
Vitesse lente en sens inverse
Bonjour , mon moteur tourne normalement dans un sens et lentement dans l'autre sens .
Comment avoir la meme vitesse de rotation dans les deux sens.
Merci
Resolu
Vesc remote .......general.......control type.......current bidirectionnal
Battery Current Max
I keep reading conflicting information, I would appreciate if anyone could conclusively confirm.
Does the Battery Current Max when using a dual Flipsky FSESC 4.20 plus need to be divided by two or does the dual recognise there is only one battery input?
*deleted duplicate*
*deleted duplicate*
Mini USB is used for HW 4.xx
Mini USB is used for HW 4.xx only. Some cheap micro USB cables are designed for charging your phone and will not work properly! Try another cable if you experience any issues.
ultra pixel survive
When you join the game, you
When you join the game, you must be quick to overcome the obstacles and compete in a life-or-death match with 29 other players. Fall Guys will provide you with a unique playground experience. Make an effort to be the lucky one who wins this race.
Batterie LTO Titanate
Ma batterie 48V 20A 20S a des cellules de 1,5 à 1,8 V et 20 A. Elle permet des charges et décharges à 5 C. soit 100AH. Est-ce que le Vesc Tool prend en charge ce type de batterie ?
Motor Wizard
Two vesc over canbus
When using an external imu to control two vesc, should the imu be connected to both vesc? Seperate imu's, what do you set the second controllers control type to? User app, also balance? I've been fighting this setup for two weeks. I just figured out today that I have to setup both controllers seperately. Without doing that the imu drifts terribly and unable to access rt data screen. I finally got it reacting to the adc arming. It shoots up level. Power is just super weak. I disconnected one motor and have no movement from second motor. Plugged second motor into first vesc and same amount of weak power so motors both work. Just seems that the second vesc isn't receiving the drive command.
I have two hoverboard motors in a 3d printed rim. Acting as one motor sort of. Seperate vesc over canbus. I feel like it's so close to being done. Then I'm starting my second build as well as an euc with an ebike motor in a moped rim. Second wheel with board that I'm building will be single motor. No more dual hoverboard motor mess. If anyone can answer my questions I would greatly appreciate it. Benjamin if you see this, thank you very much for all your hard work. Appreciate all the effort you have put into this project. I've already tested my existing euc with vesc and it's amazing. Looking forward to getting the rest of the toys switched over.
<p>I want to try this</p>
<p>I want to try this</p>
HOW TO SETUP A 2 MOTOR SYSTEM ONE ON EACH WHEEL FOR 1 4 WHEEL ev
2 MOTORS 2 CONTROLLERS canbus connected. can get fwd ok reverse OK but would like regen . seems that if i have fwd and reverse I cant have regen. Any ideas welcomed.
thanks.